How to use sudo in powershell

Well this is not exactly same as sudo.

However it is very annoying when I want to run something in powershell and it gives me access denied. And then  I need to go to start menu, or task bar, right click, select run as administrator etc just to run one command. As someone who likes to use commands over GUI, had to find a way to improve this.

The following command will open a powershell window with admin privilages.

start-process powershell -verb runas

However I find this as also a long command. So I just put this inside a function called sudo and put inside my powershell profile.

So my powershell profile looked like this.

function sudo {
start-process powershell -verb runas
}

Now, I can just run sudo from my normal powershell window and it will open an elevated prompt. Much faster, much efficient.

sudo

Although this works, ultimately this is not what I want. I want to be able to do the below without installing third party tools:

1) run within the same window ( without opening another window)

2) able to run certain commands as elevated without opening a whole powershell window – just like sudo

Will look forward to work on this, and if I get to do it, will update here.

TIL how to disable the timeout of mapped drives in Windows

I was trying to copy some big files over the network to another server, and I mapped the destination drives in the local server for easy copying. However I kept getting errors in my script, which I suspected because the drives getting disconnected. Here is how to set it to not disconnect.

Run as administrator in a command prompt, where -1 means disable.

net config server /autodisconnect:-1

TIL how to check the bandwidth between 2 servers

We subscribed for a dedicated line between 2 datacenters, and when we were trying to copy some files over, it was really slow.
We were supposed to get few MB/s transfer rate, but were getting only 20KB/s which was unacceptable. We needed to make a clear case with the service provider to get their support on fixing this. Simple google searches showed me the tool called iperf, and it provided me what I wanted. It is a shame that I never knew this tool existed.

In the destination server, I ran the iperf server by below command:

.\iperf3.exe -s -p 136 (I only have few ports open in between, and that is not currently in use)

and in the source, I ran the iperf client:

.\iperf3.exe -c <Destination IP> -p 136

The results were enough to convince the service provider to fix their network.

This is probably the most basic test that can be done using the tool, but there are plenty of other options as documented here.

How to export services and their users into csv

I need to export the services and their ‘run as’ users in a number of servers. This is how I did it.

#Ebin Issac 6/3/2018
#This will read a list of servers from a text file, and extract the services which are not run by localsystem, and save into a csv file. Need to be run from a server with elevated permissions

$ComputerList = Get-Content serverlist.txt
ForEach ($Server In $ComputerList) {
    Write-Host "Processing $($Server) ... " -ForegroundColor White -NoNewline
    Get-wmiobject -computername $Server win32_service | where { $_.startname -notmatch "localsystem"}| select-object pscomputername,Displayname,name,startname | Export-Csv "$Server.csv" -NoTypeInformation 
   # write-host $?
    If ($? -eq 'True') {
			Write-Host "OK." -ForegroundColor Green
    }
     Else {
			Write-Host "Failed." -ForegroundColor Red
    }
}

You can find the download link here.

So this will take a list of servers, and extract the services, but excludes those run by localsystem, and export into a csv. You can filter that part based on your requirements. The output will look similar to this.

ServiceUsers

How to fix puppet certificate errors

When we recently took over some client’s infrastructure, we started to get the following error.

puppet-cert-error

I just had to renew the cert to fix this. To renew, follow the steps below:

1.Delete the old certificate from client.

root@agent1:/etc/puppetlabs/puppet# mv ssl ssl.20171115

2.Delete the old certificate from server.

root@ip-172-31-7-177:/home/ubuntu# puppet cert clean agent1.ap-southeast-1.compute.internal   //make sure to change the agent name

3.Run puppet agent again, it will create a new certificate.

root@agent1:/etc/puppetlabs/puppet# puppet agent -tv
Info: Creating a new SSL key for agent1.ap-southeast-1.compute.internal
Info: Caching certificate for ca
Info: csr_attributes file loading from /etc/puppet/csr_attributes.yaml
Info: Creating a new SSL certificate request for agent1.ap-southeast-1.compute.internal
Info: Certificate Request fingerprint (SHA256): 16:E8:E6:51:46:A1:07:0E:FA:E1:E9:F9:54:C4:4E:F7:F9:EF:0E:xx:xx:xx:xx:xx:xx
Info: Caching certificate for ca
Exiting; no certificate found and waitforcert is disabled
root@agent1:/etc/puppetlabs/puppet#

4.If we get the following message, that means puppet server auto sign is not enabled, so we need to manually sign the cert from server. If it is not there, move to step 7

Exiting; no certificate found and waitforcert is disabled

5.To manually sign, first list the certs to be signed in the master.

root@ip-172-31-7-177:/home/ubuntu# puppet cert --list
"agent1.ap-southeast-1.compute.internal" (SHA256) 16:E8:E6:51:46:A1:07:0E:FA:E1:E9:F9:54:C4:4E:F7:F9:EF:0E:xx:xx:xx:xx:xx:xx
"agent2.ap-southeast-1.compute.internal" (SHA256) B1:3F:AF:A5:70:90:33:60:B8:63:EF:2C:A5:97:72:2C:DD:EF:xx:xx:xx:xx:xx:xx:xx
root@ip-172-31-7-177:/home/ubuntu#

6.Sign the certificate for that agent by :

root@ip-172-31-7-177:/home/ubuntu# puppet cert sign agent1.ap-southeast-1.compute.internal
Signing Certificate Request for:
"agent1.ap-southeast-1.compute.internal" (SHA256) 16:E8:E6:51:46:A1:07:0E:FA:E1:E9:F9:54:C4:4E:F7:F9:EF:xx:xx:xx:xx:xx:xx:xx
Notice: Signed certificate request for agent1.ap-southeast-1.compute.internal
Notice: Removing file Puppet::SSL::CertificateRequest agent1.ap-southeast-1.compute.internal at '/etc/puppetlabs/puppet/ssl/ca/requests/agent1.ap-southeast-1.compute.internal.pem'
root@ip-172-31-7-177:/home/ubuntu#

7.To verify, run puppet agent again in agent.

root@agent1:/etc/puppetlabs/puppet# puppet agent -tv
Info: Retrieving plugin
Info: Caching catalog for agent1.ap-southeast-1.compute.internal
Info: Applying configuration version '1510728583'
Info: Creating state file /var/lib/puppet/state/state.yaml
Notice: Finished catalog run in 0.01 seconds
root@agent1:/etc/puppetlabs/puppet#

How to export the last login details of all users in a Windows server using Powershell

So one of our clients want to get a monthly report on the last login details of all users in the Windows servers in our environment. So we came up with this powershell script which is scheduled to run end of every month. This will extract the data, and upload them to an S3 bucket. It makes use of awscli for uploading to s3. We can even include SNS notification, but right now it is not implemented.

Below is the script:

Disclaimer : I do not know if this is the best way to do it just like all my other scripts, but this works [ At least for me ]

$currentMonth = Get-Date -Format MM
$currentYear = Get-Date -UFormat %Y
$hostname = hostname
$filename = $currentYear+""+$currentMonth+""+$hostname+"_login.csv"
$([ADSI]"WinNT://$env:COMPUTERNAME").Children | where {$_.SchemaClassName -eq 'user'} | select @{l='name';e={$_.name}},@{l='LastLogin';e={$_.lastlogin}} | export-csv C:/temp/$filename

(gc C:/temp/$filename) -replace (gc C:/temp/$filename)[0],"" | sc C:/temp/$filename -Force
(gc C:/temp/$filename) -replace (gc C:/temp/$filename)[1],"" | sc C:/temp/$filename -Force
(gc C:/temp/$filename) | ? {$_.trim() -ne "" } | set-content C:/temp/$filename

aws s3 cp C:/temp/$filename s3://YourBucket/$currentYear/$currentMonth/

This will create a csv file in the following format.
windows_last_login

How to select full URL upon click in Firefox..

I use Firefox as my personal browser. Although I sync it, there are some settings which are not synced. So every time I reinstall or change PC, I have to redo them again and again. This is one of those things. After a re install, if I click on the address bar, it wont select the whole address. I need to click Ctrl+A for it. But with a simple tweak, we can get that functionality. For that,

  • go to about:config in firefox address bar.
  • Search for browser.urlbar.clickSelectsAll
  • FirefoxDouble click and change the value to true.

How to get a Snapshot report from AWS using Python..

I was not sure if I was making a mistake by leaving Micron for a job in a small company. Anyway I don’t regret the move. In fact I actually love this job so far. It has all the good and bad things of working in a small company. Things are messy there. But.. the opportunity to learn and perform are tremendous, and that is what I really was looking for.

I was asked to modify a python script written by an ex-employee to get the snapshot report from AWS. I have never touched python for at least 5 years, and even then, that was all about simple things. And my experience with AWS SDK were none. So when I looked at the code, I did not understand anything. So I decided to do it myself from scratch instead of modifying it.

You can find the script here.

Basically, it collects the access and secret keys as arguments, then connect to ec2, get all the running instances, then the volumes attached to it, and then the snapshots. I have no idea if it is the best way to do it. I don’t even think that I used the best python practices.  Anyway, it works well now. Once the script is executed, it will create a nice csv file as follows, which is great. It has all the fields, and it is easy to manipulate in a spreadsheet according to our needs.Snapshots

This saves us a  lot of time from checking manually for each of our customer accounts if the snapshots are there or not.

I feel pretty proud about this. You know, no matter how bad  the code is, it works. 😉


How to use your Raspberry pi to download movies automatically

DISCLAIMER: 

  • This is for educational purposes only. Do everything at your own risk. Using bit torrent is not illegal, but downloading copyrighted materials are.
  • Do not use this in a production environment. We are considering zero security in this case.

EDIT:

I see that this post gets a lot of attention. If this works/doesn’t work please let me know in the comment section, or email me at ebin@ebinissac.me.

What we are going to build:

An always on torrent box that periodically checks for new torrents as defined and download them.

What we will be using:

•    Raspberry pi 3 model b with Raspbian Jessie installed.
•    Official raspberry pi 3 PSU as third party PSU’s may not provide enough power
•    External HDD
•    USB fan or heatsink (Recommended, not necessary)
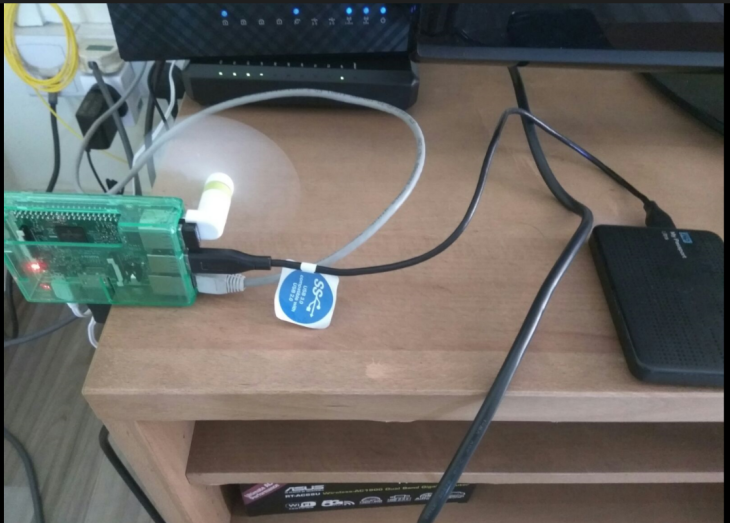
mysetupmy current setup

Assumptions:

•    You have vnc / physical access with GUI to your pi
•    You have a user named pi with sudo access (this available by default)
•    You know the password of user pi

Note: We will be doing most of the configurations in a terminal.


1) Install and enable apache webserver
This will help to access the contents over a webserver. Install it by typing

sudo apt-get install apache2

Once installed, start and enable it

sudo systemctl enable apache2
sudo systemctl start apache2

Give everyone full permission to the documentroot. [This is not safe at all in  a production environment.]

sudo chmod 777 /var/www/html

2) Connect the hard disk, create mountpoint and setup automount

•    Connect your hard disk to the pi. Make sure that it works by accessing the contents. If you see a lightning bolt symbol on the top right corner of the screen, that means the pi is not getting enough power to work properly. Use the official PSU in this case.
•    Open a terminal, and see where the hard disk is mounted, by using the following command

df


df

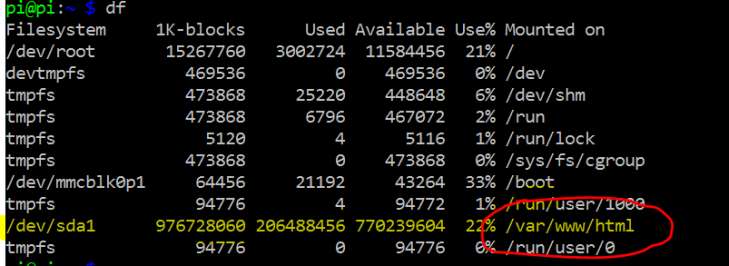
In this case, it is mounted in /var/www/html. This will not be your case. It will probably in something like /media/pi/xxx . Whatever it is take note of it. Let us call this value as initial_mount_point

•    Get the block id of the hard disk. Take note of the value starting from UUID

blkid

•    Configure fstab so that the hard disk will mount to a certain point after reboot

sudo nano /etc/fstab

• This will open the fstab file in nano text editor in the terminal. Navigate to the end of the line, and type the following

UUID=”xxxxxxxx” /var/www/html ntfs defaults 0 0

Where “xxxxx” is the block id that you got from the previous step.

fstab

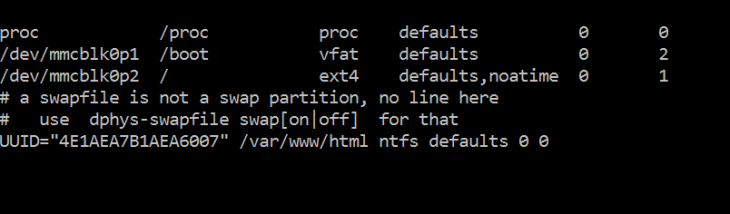
Type CTRL+O to save and CTRL+X to exit the editor.

•    Unmount the hard disk from initial mount point

sudo umount initial_mount_point

where initial_mount_point is what you got from the first step, which is something like /media/pi/xxxx • Now mount the hard disk to the new mount point.

sudo mount –a

• Verify that it worked by typing the df command. You should get output like this.

df

3) Install and configure flexget

Felxget will be the tool that we use to download torrent files based on our preferences. The following information is from their website.(https://www.flexget.com/InstallWizard/Linux)
•    Python
FlexGet requires Python 2.7, 3.3 or newer to run. You can check your version with command.

python -V

If it is not available, install it by using the following command in terminal

sudo apt-get install python3.5

PIP

Second piece of required software is python package manager called PIP. This can be usually found from operating system package repository under name python-pip or python3-pip. If you install python3-pip it may need to be used via command pip-3.5 or something similar.
Install it by using the following command
sudo apt-get install python-pip5

• Upgrade setuptools

Using latest setuptools will save headaches in some older installations, this can be achieved with
sudo pip install --upgrade setuptools

• Install in a virtualenv

This is the recommended way unless you want multiple accounts in the system to be able to use FlexGet without each having to install it themselves.

Install virtualenv:

sudo pip install virtualenv

Create Virtualenv: This creates isolated python environment. You can create as many of these as you like for each python application you use.

virtualenv ~/flexget/

Install FlexGet in the virtualenv:

cd ~/flexget/
bin/pip install flexget

Create a folder to save the torrent files that are downloaded.

sudo mkdir /home/torrents
sudo chmod 777 /home/torrents

Configure flexget to download torrents automatically

This is the most important and confusing part. Here I am sharing only what I did and found to be working. You can find many other configurations from here and here.

We will configure only to download new Malayalam movies published in extratorrent.cc , English movies published in yts.ag and new episodes of Sherlock from anywhere.

To do that,
Navigate to the install directory

cd ~/flexget

Create a configuration file using nano editor

nano config.yml

Type the following:

tasks:
  Download Sherlock:
    rss: https://showrss.info/show/269.rss
    series:
      – Sherlock
    regexp:
      accept:
        – 720p
    download: /home/torrents/
  Download movies:
    rss: http://extratorrent.cc/rss.xml?type=search&search=malayalam+2016
    regexp:
      accept:
        – DVDRip
      reject:
        – cam
        – 2GB
    download: /home/torrents/
  Download english movies:
    rss: https://yts.ag/rss/2016/720p/all/5
    regexp:
      accept:
        – yts
    download: /home/torrents/

config

IMPORTANT: DO NOT USE TABS, INSTEAD USE SPACES. WATCH THE ABOVE VIDEO AND READ THROUGH THE SITE FOR MORE INFO ON HOW TO FILL THIS FILE

CTRL+O and CTRL+X to save and exit

Instead of typing the above, you may download my config file from here.

•    Test the configuration
Navigate to the flexget install folder and make it executable

cd ~/flexget/bin
sudo chmod +x flexget

Test the configuration by following command:

./flexget --test execute

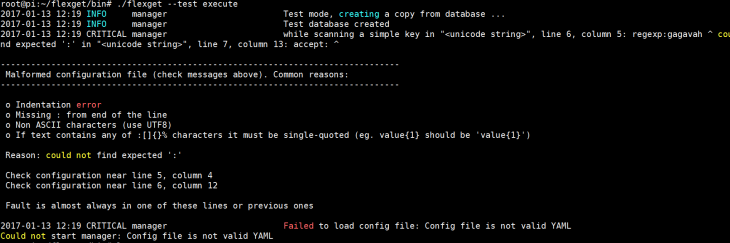
If your output is similar to the following, there is something wrong with your config.

config-error

If everything is OK, you will get something like this:

config-ok

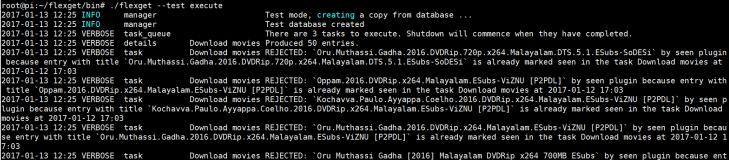
Now let us execute flexget to download the torrent files.

./flexget execute

This will download the torrent files to the folder we created earlier, to /home/torrents. Let us verify

ls /home/torrents

torrents

There will be a lot of .torrent files. Mine has that .added name because all of them are already completed downloading.

4) Install and configure transmission to download the files using the torrent files already downloaded.

sudo apt-get install transmission-gtk

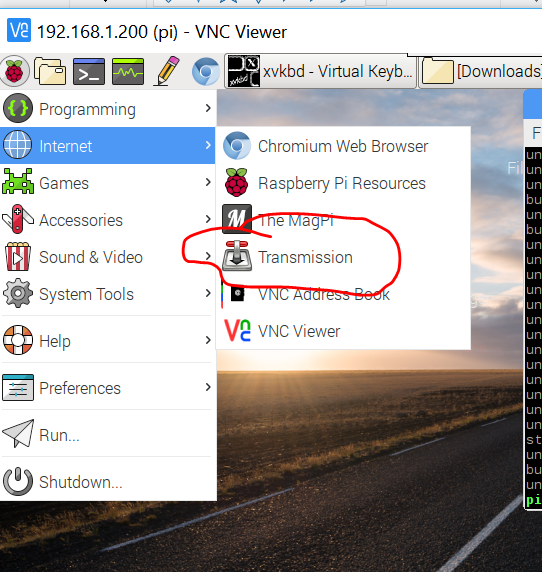
Open transmission from the start menu

transmission1

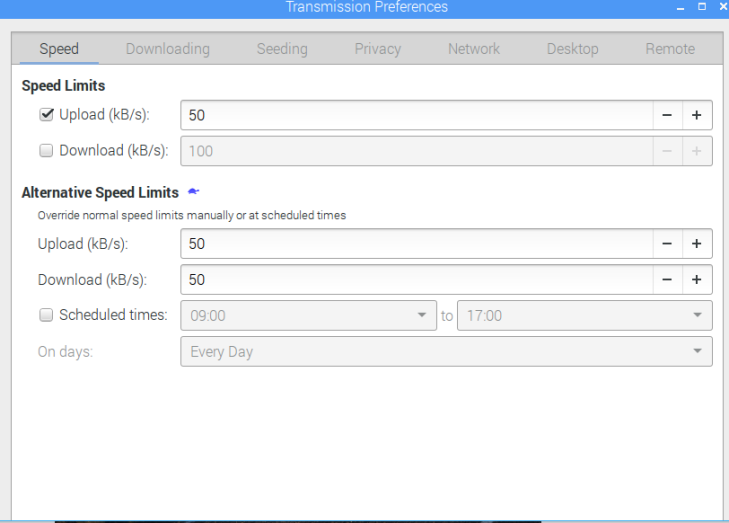
Go to edit-preferences, Set the speed limits you want from Speed tab

transmission2

In the downloading tab,

transmission3

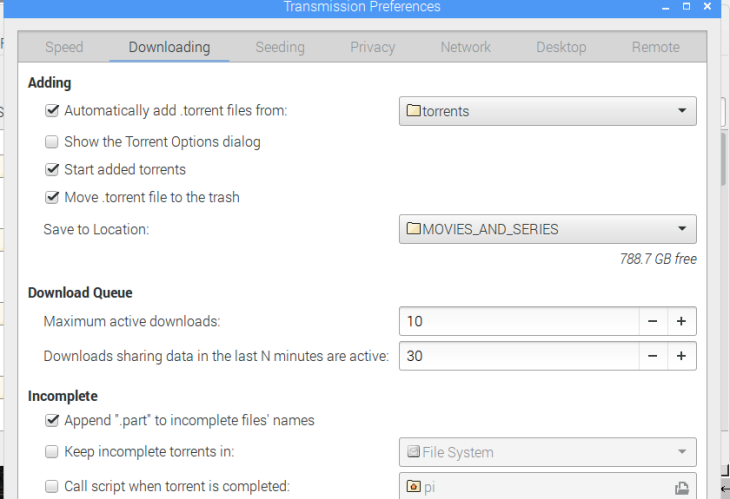
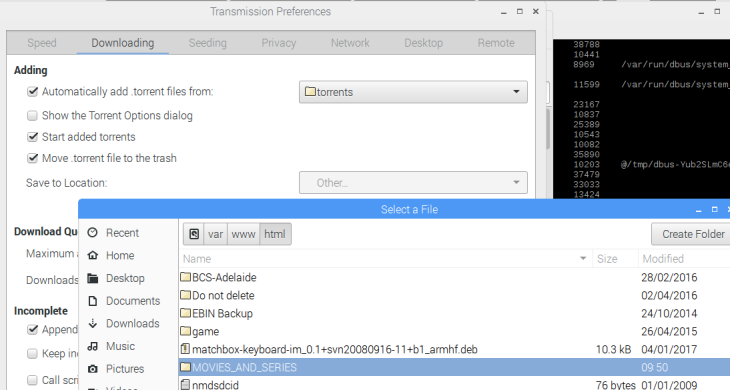
In automatically add .torrent files from, select /home/torrents folder Untick show the Torrent Options Dialog Tick Start added torrents In Save to Location, navigate to your hard disk mount point, which is /var/www/html and select the folder you want.

transmission4

You can leave the other settings as it is, or change it if you need. Now wait a few minutes and you can see that the torrents start downloading.

5) Configure flexget to check for torrents periodically

We will setup flexget to check for new torrents every hour and download it if found. For that, we will use crontab, which is pre installed in the system.

Open crontab by following command:

crontab –e

This will open the crontab file in a text editor. Navigate to the end and add the following lines:

# to run flexget without generating log files
20 * * * *  /home/pi/flexget/bin/./flexget execute

# start transmission-gtk version minimized if it is not already running
*/30 * * * * export DISPLAY=:0 && if pidof -x /usr/bin/transmission-gtk; then exit; else /usr/bin/transmission-gtk -m; fi &

CTRL+O and CTRL+X to save and exit

By now, you have your pi configured to check for new torrents every hour and download it to the hard disk connected to it. In the following steps, we will make it accessible via a web browser or as a network drive.

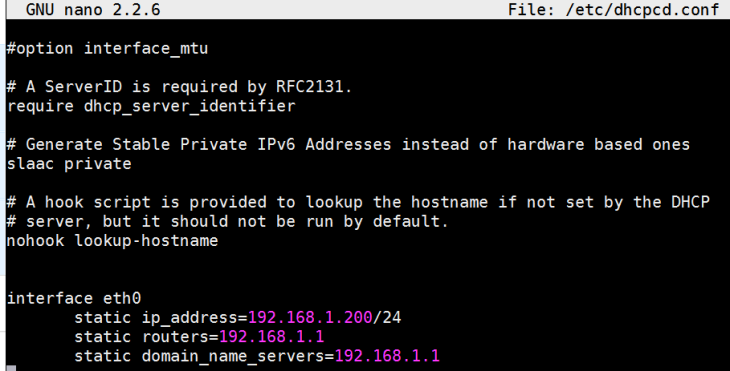
6) Configure a static ip address to the pi

sudo nano /etc/dhcpcd.conf

Go to the end of the file and add the following:

interface eth0

static ip_address=192.168.1.200/24
static routers=192.168.1.1
static domain_name_servers=192.168.1.1

interface wlan0

static ip_address=192.168.1.200/24
static routers=192.168.1.1
static domain_name_servers=192.168.1.1

Here, you need edit based on your needs. My router address is 192.168.1.1 and I set my ip to be 192.168.1.200.

ip

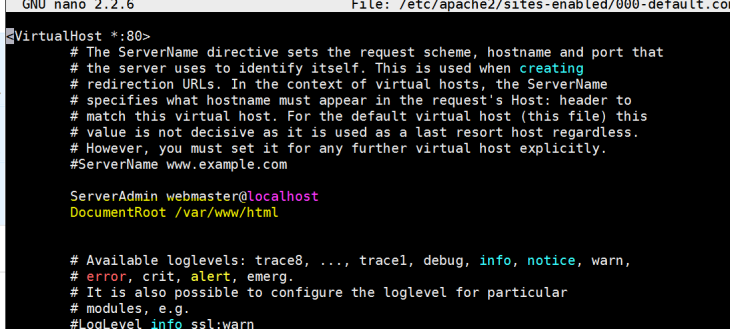
7) Configure apache web server.

We will use the default configuration settings here. To verify it,

sudo  nano /etc/apache2/sites-enabled/000-default.conf

Just make sure that the DocumentRoot is set to be /var/www/html. If it is not, edit it. Mostly there is no need to edit.

apache2

Restart the web server

sudo systemctl restart apache2

Verify that it works by going to the webpage from a browser. Note that this device should be connected to your home network. You should be able to access the hard disk contents now.

You will be able to watch videos from your browser.

video

8) Install and configure samba for using as a network drive

sudo apt-get install samba
sudo nano /etc/samba/smb.conf

This will open samba configuration file in nano. Go to the end of the file and type the following, and save and exit.

[movies]
  path = /var/www/html/
  public = yes
  read only = yes
  guest ok = yes
  browseable = yes

samba

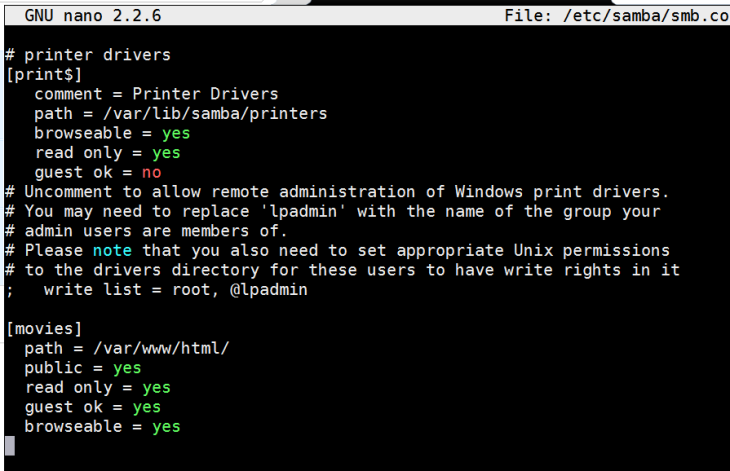
Enable and restart samba.

sudo systemctl enable smbd
sudo systemctl restart smbd

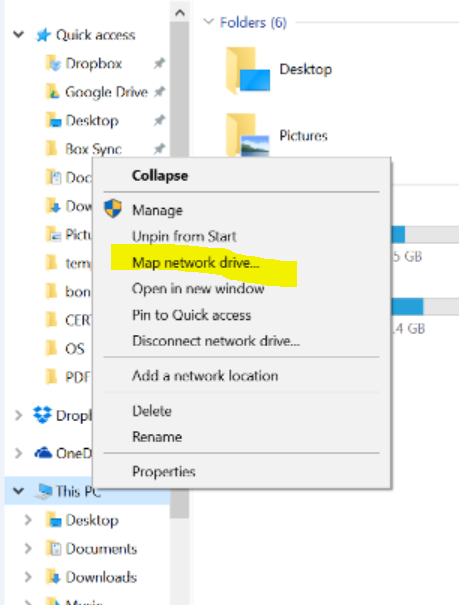
Now you can map this as a network drive in your windows PC. To do this in windows 10, right click My PC, then click Map network drive.

map1

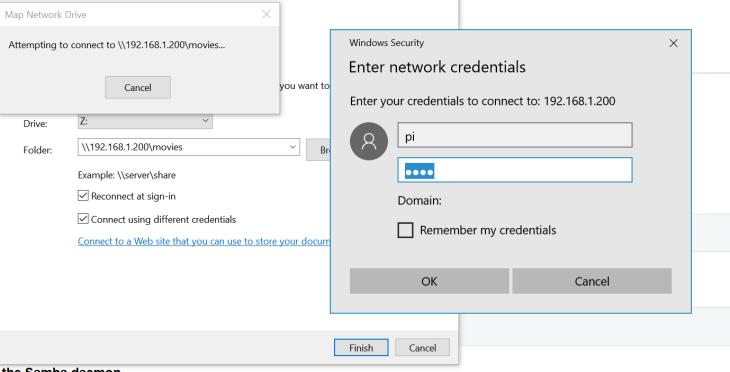
Enter the ip address and share name as follows. Share name is movies as we configured earlier. Check connect using different credentials. Enter username as pi and the password to connect.

map2

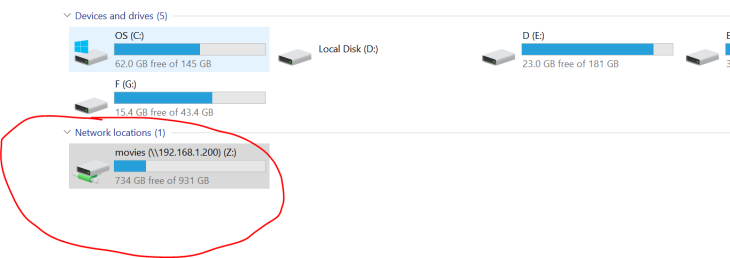
You should have it connected as a drive now.
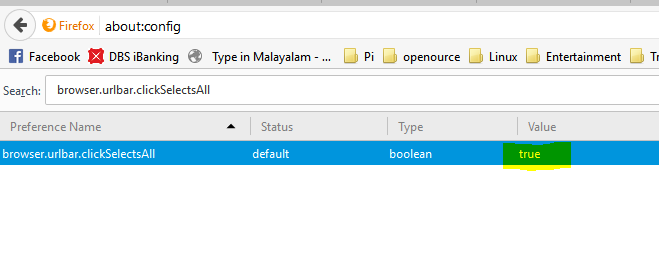
map3